Bodymodification – How to: Ohren dehnen Teil 2 (+English version)
(Please, scroll down for the English version)
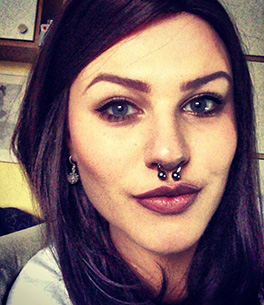
Nachdem ich euch letzte Woche die ersten Schritte des Ohrendehnens erklärt habe, solltet ihr zumindest einen ersten Eindruck bekommen haben. Die 1,5mm-Marke ist erreicht. Der nächste Schritt sollten die 2mm sein, dabei geht ihr vor wie letzte Woche beschrieben. Und natürlich wieder zweimal täglich desinfizieren.
In 2mm-Schritten geht ihr nun nach oben. Also 4mm, 6mm, 8mm, usw. Dabei aber bitte immer die Zeit von mindestens drei Wochen Abheilung bedenken! Ganz wichtig, sonst kann das Gewebe des Ohrläppchens reißen oder ihr bekommt einen Blow-Out. Was ist ein Blow-Out? Dieses widerliche Ding entsteht, wenn ihr es mit dem Dehnen zu eilig habt. Dabei vernarbt die Innenseite des Ohrlochs und der untere Rand dreht sich – wupps – nach außen. Glaubt mir, das sieht echt nicht schön aus.
Sollte es aber doch der Fall sein, dass es zum Blow-Out kommt, hilft meist nur eins: Downsizen. Das ist wirklich ärgerlich, da die Abheilungszeit ja eh schon lange genug dauert. Es muss aber leider Gottes sein. Ansonsten wird der Blow-Out immer riesiger und schlimmer. Manche behaupten, man könnte das geblowte Gewebe einfach wegdehnen. Aber ich rate euch dringend davon ab!
Ein wichtiger Hinweis für alle, die ihre Tunnel eventuell nicht für immer behalten wollen: Ab ca 8 bis 10mm ist es unwahrscheinlich, dass sich der Tunnel je wieder komplett von selbst schließt. Also denkt gut nach, bevor ihr bis zu diesem Schritt dehnt.
Seid ihr bei der Wunschgröße angekommen, ( Und ich sage euch, diese Wunschgröße gibt es eigentlich nicht, denn Dehnen macht süchtig!) empfehle ich euch trotzdem wieder die Heilungszeit von 3 Wochen einzuhalten, bevor ihr den Dehnschmuck durch einen Tunnel oder Plug ersetzt. Solltet ihr merken, dass sich euer Ohrläppchen etwas trocken anfühlt, vor allem jetzt im Winter, cremt es am besten mit etwas Bepanthen ein.
Mehr zum Thema wieder nächste Woche!
Bodymodification – How to: Teil 1
Bildquelle: http://24.media.tumblr.com/d20c7a4c719225d9740cee0acc6280ab/tumblr_mvib79XsE31qkwipyo1_500.jpg

English version
After I explained the first steps of gauging your ears to you last week you should have a first impression of this process. Now, you have stretched your ears to 1.5mm . Next step would be 2 mm. You reach this size the way I just like I told you last week. And of course sanitize your ears twice a day again.
If your ears are gauged to 2mm, go up by 2mm, which means the next step is 4 mm, then 6 mm, 8 mm, and so on. Please mind the process of healing with each step which takes at least 3 weeks! This is very important, otherwise your ear’s tissue can be damaged and rip or you can get a blow-out.
What is a blow-out? Well, this disgusting thing is caused by gauging too fast. The inner side of your lobe starts scarring and the lower part of it turns inside out. Believe me this doesn’t look any cute. In case you do get a blow-out there’s only one thing that can help: down-sizing. This really sucks because the healing process takes long enough anyways but it is necessary. Otherwise the blow-out can get even worse. Some people say you could get rid of blow outs by simply gauging them away but I hardly doubt this would really work.
An important hint for everyone that isn’t sure about keeping their ears stretched forever: At the size of 8 to 10 mm your lobe won’t completely close up by itself anymore. So think thoroughly before you start stretching your ears to 8mm.
When you have reached your perfect size ( Trust me there is no perfect size because stretching your ears is sooo addictive!) I recommend keeping the healing process in mind though. And keep your gauging jewelry in for another three weeks before switching to regular plugs or gauges. Whenever you notice your ear tissue feels dry, especially in this cold season, just apply some greasy lotion like Bepanthen.
Read more about this topic next week!
Bodymodification – How to: Part 1
Image Copyright: http://24.media.tumblr.com/d20c7a4c719225d9740cee0acc6280ab/tumblr_mvib79XsE31qkwipyo1_500.jpg


